PostgreSQL: Zugriff auf fremde Datenbanken

(English version)
Komplexe Lösungen bestehen häufig aus mehr als einer Datenbank, manchmal sogar unterschiedlichen Typs. Im Fall von Sco2t haben wir eine „geerbte“ MySQL-Datenbank, während neue Daten wegen der erweiterten GIS-Funktionalität in PostgreSQL liegen. Natürlich müssen gewisse Daten zwischen beiden Systemen synchronisiert werden.

Pentaho Data Integration ist dafür eine sehr gute Lösung und wird auch intensiv verwendet. Allerdings möchte ich in einigen Fällen sofort auf Änderungen reagieren und nicht erst eine Minute später. (Und auch nicht ständig Java-Prozesse starten, die die meiste Zeit keine Änderungen finden.) Dafür bieten sich PostgreSQL-seitig Trigger an, die Änderungen an einer Tabelle in der MySQL-Datenbank nachvollziehen.

PostgreSQL 9.1 hat die erste Version der Foreign Data Wrappers genannten Funktionalität bekommen, seit 9.3 können diese sogar in fremde Datenbanken schreiben. Ein FDW-Modul für den Zugriff auf andere PostgreSQL-Server ist in 9.4 im PostgreSQL-Contrib-Bereich dabei, Module für viele andere Datenbanken (auch NoSQL und Hadoop!) sind verfügbar.

(Linked Server sind schon seit Längerem in vielen Datenbanksystemen verfügbar, PostgreSQL hatte dafür „dblink“. Diese Funktionalität hat sich aber großteils auf Verbindungen zum eigenen Datenbanktyp beschränkt.)

EnterpriseDB hat ein FDW-Modul für MySQL realisiert. Derzeit muß man es selbst kompilieren, da in den üblichen Repositories keine fertigen Pakete enthalten sind. Das ist aber nicht schwierig.

Installation auf einem Debian-System:


git clone https://github.com/EnterpriseDB/mysql_fdw.git

apt-get install make gcc libmysqlclient-dev postgresql-server-dev-9.4

cd mysql_fdw

make USE_PGXS=1

make USE_PGXS=1 install

Damit ist das Modul übersetzt und als PostgreSQL-Extension installiert. Der Rest passiert als PostgreSQL-User mit Superuser-Rechten in SQL:


CREATE EXTENSION mysql_fdw;

CREATE SERVER mysql_server FOREIGN DATA WRAPPER mysql_fdw

OPTIONS (host '127.0.0.1', port '3306');

CREATE USER MAPPING FOR username SERVER mysql_server

OPTIONS (username 'myuser', password 'mypassword');

CREATE FOREIGN TABLE mysqltabelle (

-- Felder aus der MySQL-Tabelle mit ihrem Datentyp

)

SERVER mysql_server

OPTIONS (dbname='datenbankname', table_name='OriginalTabelleName');

Damit ist die Fremdtabelle „mysqltabelle“ in der PostgreSQL-Datenbank angelegt und kann wie eine normale Tabelle angesprochen, gelesen und beschrieben werden.

CREATE EXTENSION registriert das Modul in der aktuellen Datenbank. (Verwendet man mehrere Datenbanken auf einem Server, muß CREATE EXTENSION in jeder, die die Funktionalität braucht, ausgeführt werden.)

CREATE SERVER erzeugt die Verbindung zum fremden Datenbankserver und gibt die Verbindungsparameter an.

CREATE USER MAPPING ist notwendig, um PostgreSQL-seitige User mit einem User in der fremden Datenbank zu verknüpfen. Es können mehrere Mappings für unterschiedliche User angelegt werden.

CREATE FOREIGN TABLE definiert dann die Fremdtabelle und gibt ihren Namen in der fremden Datenbank an. Die Datentypen der Felder müssen in PostgreSQL existieren. Es ist möglich, Constraints wie NOT NULL oder Default-Werte schon PostgreSQL-seitig anzugeben.

Foreign Tables eröffnen ganz neue Möglichkeiten der Datenintegration: Daten müssen nicht mehr hin und her kopiert werden, stattdessen sind sie in der Master-Datenbank und die anderen Datenbanken arbeiten immer mit der aktuellen Kopie. Datenübernahmeprozesse können direkt in der Datenbank, ohne Zwischenschaltung einer ETL-Software ausgeführt werden. Ich bin gespannt, welche Anwendungsmöglichkeiten mir noch einfallen.

Accessing foreign databases in PostgreSQL

Many complex solutions use more than one database, sometimes even different database systems. At Sco2t we „inherited“ a MySQL database, but new data are stored in PostgreSQL because of the better GIS functionality. So some data need to be kept in sync between the two systems.

Pentaho Data Integration is a great solution for this and it’s already in heavy use. In some situations, however, I’d like to react to changes instantly instead of waiting a minute. (Also, I dont’t want to start Java processes frequently that don’t have to process any changes most of the time.) In PostgreSQL, we can use triggers for updating data in other tables, now even in the MySQL database.

PostgreSQL 9.1 was the first release with Foreign Data Wrappers functionality. With 9.3, even writing into foreign databases is supported. In 9.4 there is a FDW module for accessing other PostgreSQL servers in the Contrib area. Modules for accessing other database types (even NoSQL and Hadoop!) available.

(Linked server functionality has been available in many database systems for a long time. PostgreSQL had „dblink“. However, linked servers usually had to be of the same type.)

There is a FDW module for MySQL from EnterpriseDB. Currently we need to compile it ourselves, as there are no binary packages in the usual repositories. But it’s not hard.

This is the installation on a Debian system:


git clone https://github.com/EnterpriseDB/mysql_fdw.git

apt-get install make gcc libmysqlclient-dev postgresql-server-dev-9.4

cd mysql_fdw

make USE_PGXS=1

make USE_PGXS=1 install

After this, the module is compiled and registered as a PostgreSQL extension. The rest of the procedure has to be executed (with database superuser rights) in SQL:


CREATE EXTENSION mysql_fdw;

CREATE SERVER mysql_server FOREIGN DATA WRAPPER mysql_fdw

OPTIONS (host '127.0.0.1', port '3306');

CREATE USER MAPPING FOR username SERVER mysql_server

OPTIONS (username 'myuser', password 'mypassword');

CREATE FOREIGN TABLE mysqltable (

-- Fields of the MySQL table, including their type

)

SERVER mysql_server

OPTIONS (dbname='databasename', table_name='OriginalTableName');

The result of this script is a foreign table „mysqltable“ in the PostgreSQL database. This table can be used like any normal table, you can read and write it.

CREATE EXTENSION registers the compiled module in the current database. (When using multiple databases on a server, CREATE EXTENSION must be executed in each database that will contain foreign tables.)

CREATE SERVER creates the link to the foreign database server and defines connection parameters.

CREATE USER MAPPING is necessary to link a PostgreSQL user to a user in the foreign database. Multiple mappings can be created for different users.

CREATE FOREIGN TABLE defines the foreign table and its name in the foreign database. The field types must exist in PostgreSQL. It is possible to define constraints like NOT NULL or give default values on the PostgreSQL side.

Foreign tables open entire new worlds of possibilities for data integration. Master data don’t need to be copied to multiple databases: other databases can work directly on the original which is always current. Data integration processes run in the database, without a separate ETL software. It’ll be interesting to explore further ideas and usage scenarios.
Die Woche der Updates

Zwei der wichtigsten Werkzeuge für Data Scientists, mit denen ich arbeite, sind diese Woche in neuen Versionen erschienen: RapidMiner und Pentaho.

English version

RapidMiner Studio 6.3 und Server 2.3

In Studio wurden die unterstützenden Vorschläge für neue User weiter verbessert. Früher hat Studio nur Operatoren vorgeschlagen, die zu den aktuellen passen; jetzt zeigt es auch an, welche Einstellungen häufig verwendet werden. Außerdem wurde der Excel-Import wesentlich beschleunigt, indem die relevanten Teile neu implementiert wurden, statt wie bisher eine Library zu verwenden.

Am Server debütieren HTML5-Diagramme und -Karten, auf die ich mich besonders freue. Die HTML5-Diagramme sollen mittelfristig die bisherigen Flash-basierten Diagrammformate ablösen, die ja unter anderem die mobile Nutzung der Dashboards verhindern.

Ein lang erwartetes Feature am Server war die Versionierung der Prozesse. Dies ist endlich möglich.

Für Big-Data-Umgebungen wurden weitere Verbesserungen eingeführt, unter anderem Kerberos-Authentifizierung in Hadoop-Clustern und die Unterstützung von Apache Spark für eine schnellere Verarbeitung vieler Aufgaben.

RapidMiner kann auf der Homepage heruntergeladen werden.

Pentaho BI Platform 5.3

Die Neuerungen in der Pentaho-Plattform sind einerseits dem Bereich Big Data zuzuordnen, andererseits inkrementelle Verbesserungen und Bugfixes. Auch ein Patch von mir für die Unterstützung von Sequenzen in Netezza-Datenbanken ist in Data Integration aufgenommen worden.

Pentaho Community Edition ist auf der Community-Seite herunterzuladen.

A week of updates

Two of the most popular tools of data scientists – which I work with most frequently – received updates in this week.

RapidMiner Studio 6.3 and Server 2.3

Studio got improvements for new users in the operator recommendation functionality. In earlier versions, it recommended only useful or frequently used operators matching the current process. Now, also sensible settings for the operators are shown. Also, import of Excel files was improved by implementing the needed functionality in RapidMiner instead of using an existing library.

On the server, HTML5 charts and maps are available for the first time. They will replace the older Flash based charts which were problematic in mobile and open source environments.

A long-awaited feature, versioning of processes on the server, is finally available.

There are further improvements for Big Data environments: Kerberos authentication for Hadoop clusters and support for Apache Spark for faster processing of many workloads.

RapidMiner is available for download on the homepage.

Pentaho BI Platform 5.3

The news in this release are mainly in the Big Data area and also incremental improvements as well as bugfixes. I also contributed a patch for sequence support in Netezza databases that went into Data Integration.

Pentaho Community Edition is available on the Community page.


JSON-Verarbeitung in RapidMiner

(English version below)

Da man immer wieder auf Datenquellen im JSON-Format stößt, möchte ich auch zeigen, wie man sie mit RapidMiner verarbeitet.

Früher gab es nur den Operator „Json to XML“. Dieser versucht, die JSON-Datenstruktur in XML abzubilden, sodaß man sie dann mit dem vorhandenen Read XML-Operator verarbeiten kann. Leider schlägt das in vielen Fällen fehl, da JSON wesentlich weniger strukturiert sein kann als XML.

Mit der Version 6.2 wurde aber ein genialer Operator eingeführt, der die Verarbeitung extrem erleichtert und elegant macht: Json to Data. Im Prinzip bildet er die Struktur des JSON-Dokuments mit der kompletten Hierarchie inkl. Arrays in Spalten ab, die nach dem „JSON-Pfad“ zum Element benannt sind.

Natürlich können da sehr breite Datenstrukturen rauskommen, aber damit hat RapidMiner kein Problem. Mit einem simplen Trick kann man diese „unbequeme“ Datenstruktur bearbeiten: Der Transpose-Operator transponiert die Spalten in Zeilen, und erzeugt damit eine viel simplere Tabelle, die leicht weiterzuverarbeiten ist.

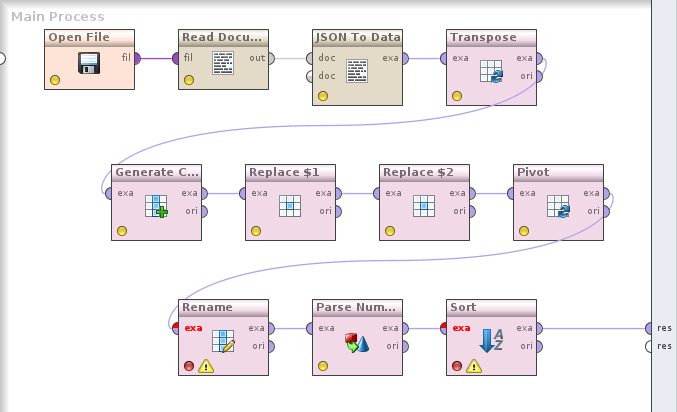
So sieht der Prozess zur Verarbeitung des JSON-Dokuments aus dem letzten Betrag aus:

RapidMiner-Prozess zur JSON-Verarbeitung

(Prozess herunterladen)

Open File öffnet die URL und gibt ein File-Objekt aus. Read Document liest den Inhalt des File-Objekts und gibt ihn als Document (unstrukturierter Text) aus. JSON To Data konvertiert das Dokument in eine RapidMiner-Tabelle (in diesem Fall mit 24.000 Spalten und einer Zeile). Transpose klappt die Zeilen und Spalten dann um.

Es ist sinnvoll, einen Haltepunkt auf Transpose zu setzen (F7, Breakpoint after) und die Daten anzuschauen. Es gibt eine ID-Spalte, die den Pfad zu den Daten (in diesem Fall in Array-Syntax: [x][y]) enthält, und eine Attribut-Spalte, die die Daten selbst enthält. Alles wurde in Strings konvertiert.

Beispiel-Ausgabe:

id att_1
[0][0] 194.0
[0][10] Conglomerates
[0][11] Minnesota

Da wir die zwei Dimensionen des Arrays in zwei separaten Spalten brauchen, kopieren wir die ID-Spalte, und transformieren sie und ihre Kopie mit regulären Ausdrücken. Das Ergebnis sieht so aus:

id id2 att_1
0 0 194.0
0 10 Conglomerates
0 11 Minnesota

Das id-Feld ist die Gruppe und das id2-Feld der Spaltenindex. Diese Struktur wird mit dem Pivot-Operator so konvertiert, daß id die Zeile definiert und id2 die Spalten. Diese brauchen dann nur mehr umbenannt zu werden. Danach werden noch die String-Spalten in Zahlen konvertiert und das Ergebnis nach dem Sort-Feld sortiert.

Fertig! Elegant und intuitiv, wie von RapidMiner gewohnt.

Processing JSON documents in RapidMiner

Data scientists frequently have the requirement to process JSON documents. I’d like to show how one can process them in RapidMiner.

Until recently, the only way was using the operator „Json to XML“. This operator tries to convert the original structure of the JSON document to XML so it can be processed using Read XML. Unfortunately, JSON is usually less structured than XML so this fails quite often.

A great operator was introduced in  version 6.2 that makes processing JSON much easier and more elegant: Json to Data. It converts the structure of the JSON document to columns named by the „JSON path“ of the element.

This can lead to very broad data structures with hundreds or thousands of columns, but this is not a problem for RapidMiner. Using a simple trick, this unusual data representation can be changed: the Transpose operator flips columns to rows, so the table becomes much simpler.

This is a process for loading an example JSON array from the web and converting it into a tabular structure with metadata:

RapidMiner process for processing JSON

(Download process)

Open File loads the contents from the URL and returns a File object. Read Document reads the contents of the file and returns an unstructured Document object. JSON to Data takes the document and converts it into a RapidMiner example set. (In this case, the table has 24,000 columns and one row.) Transpose changes the columns into rows.

You could set a breakpoint on Transpose (F7, Breakpoint after) and look at the data. There’s an ID column which contains the JSON path of the attribute value (in this case, in array syntax: [x][y]), and an attribute value column with the data. Everything was converted to strings.

Example:

id att_1
[0][0] 194.0
[0][10] Conglomerates
[0][11] Minnesota

We need both dimensions of the array as separate columns, so we copy the ID column and transform both copies using regular expressions. This is the result:

id id2 att_1
0 0 194.0
0 10 Conglomerates
0 11 Minnesota

The id field is the group and id2 the column index. This structure is processed with the Pivot operator by using id as the row identifier and id2 as the column. Then we rename the columns, convert string columns to numbers and sort the results by the value of the Sort field.

That’s it! Elegant and intuitive, thanks to RapidMiner.

Owncloud als Laufwerk einbinden

(English version)

Owncloud ist eine sehr nützliche Software, um Dateien auf dem eigenen Server abzulegen, für andere freizugeben und von mehreren Rechnern aus zu nutzen. Technisch findet der Dateizugriff entweder über den Browser oder übers WebDAV-Protokoll statt.

Als Berater bin ich oft in fremden Netzwerken unterwegs, die alle möglichen Einschränkungen haben, z. B. auch häufig die großen Cloud-Speicher-Anbieter blockieren. Ein eigener Server, auf den man über HTTPS zugreifen kann, ist da sehr nützlich.

Unter Linux ist der Aufwand, die Inhalte ins Dateisystem einzubinden, dank davfs2 nicht sehr groß. Die Konfiguration ist gut beschrieben und schnell erledigt.

Windows ist ein anderes Thema. Die Anleitung von Owncloud selbst funktioniert nicht unter allen Windows-Versionen; man müßte in der Registry Einstellungen setzen, damit es geht. Ohne Admin-Rechte ist das zum Scheitern verurteilt.

Vor einiger Zeit habe ich CarotDAV entdeckt und bin schnell ein Fan davon geworden. Neben der Installationsversion existiert auch eine „Portable“-Version, die keine Installation und somit keine Administratorrechte braucht – sie läuft auch von einem USB-Stick.

Neben WebDAV für Owncloud beherrscht CarotDAV auch weitere Anbieter wie Dropbox, Google Drive, OneDrive usw.

Der Clou ist, daß man unter Tool/Setting/DAV Server einen Laufwerksbuchstaben einrichten kann, unter dem alle konfigurierten Zugänge (Owncloud und andere) als Verzeichnisse zur Verfügung stehen. Somit kann man sie ohne Zusatzsoftware und Installation einfach in allen Windows-Programmen verwenden.

CarotDAV-Laufwerk im Explorer

Es ist eine gute Idee, ein „Master Password“ zu setzen. Damit wird die Konfiguration verschlüsselt, die Paßwörter der einzelnen Dienste und Server sind also geschützt. Beim Starten von CarotDAV muß das Paßwort eingegeben werden; wenn man den Computer verläßt, kann man den Desktop sperren und/oder CarotDAV beenden.

Mounting Owncloud as a drive

Owncloud is a great software for storing files on your own server, sharing with others and using them from many locations. Data access is done in the browser or using the WebDAV protocol.

As a consultant I’m frequently working in foreign corporate networks with a variety of limitations. The big cloud storage providers are frequently blocked there. Having my own server with HTTPS access is very useful in these situations.

On Linux, mounting the remote service is easy using davfs2. The configuration is easy and well documented.

Windows is another topic, however. The Owncloud tutorial doesn’t work on many Windows versions or requires changes in the registry that can be only performed with admin rights.

Fortunately I found CarotDAV and quickly became a fan. In addition to the installable version there’s also a „Portable“ one that doesn’t require administrator rights and also runs from a USB stick.

CarotDAV supports Owncloud access over WebDAV, but also other providers like Dropbox, Google Drive, OneDriver and more.

A great feature is the ability to specify a drive letter in Tool/Setting/DAV Server. Each configured account (Owncloud and others) is displayed as a subdirectory of this drive. This means that all Windows programs are able to work with the files stored on all your cloud storage providers.

CarotDAV drive in Windows Explorer

It’s a good idea to set a Master Password. This encrypts the configuration and protects the passwords of the cloud services. When starting CarotDAV, the password must be entered; if you leave the computer, you can lock the desktop or end CarotDAV.

JSON-Array in PostgreSQL verarbeiten

(English version)

Neulich mußte ich eine JSON-Datenstruktur aus einer Web-Quelle holen und in die Datenbank einfügen. Das Besondere an diesen Daten ist, daß sie einfach in einem zweidimensionalen Array liegen, die Webseite interpretiert die Daten selbst. Es sind also keine Feldnamen im JSON.

In R ging es recht einfach:

require(rjson)

# JSON-Array laden, List daraus machen
global2k_lst <- fromJSON(file="http://www.forbes.com/ajax/load_list/?type=organization&uri=global2000&year=2014");
# Die Liste in einen eindimensionalen Vektor konvertieren
global2k <- unlist(global2k_lst)
# Durch die Angabe der Dimensionen wird eine Matrix daraus
dim(global2k) <- c(12,2000)
# Aus der Matrix dann ein Data Frame machen und die Felder benennen
global2k <- as.data.frame(t(global2k))
names(global2k) <- c("rank", "urlname", "name", "logoname", "sort",
                     "sales", "profits", "assets", "marketvalue",
                     "country", "industry", "us_state")

write.csv2(global2k, "/tmp/forbes2000.csv", row.names=FALSE)

Andererseits hat PostgreSQL seit Version 9.3 viele JSON-Funktionen. Wie funktioniert es also direkt in der Datenbank?

Erst mal habe ich den ganzen JSON-String in eine Tabelle ins Feld „forbes2k_json“ eingelesen. (PostgreSQL hat ja auch mit 244 kByte Daten in einem Feld kein Problem.) Der Inhalt des Arrays läßt sich dann mit PostgreSQL-Mitteln mit etwas Aufwand als Tabelle ausgeben:

-- JSON-Array in 2000 Zeilen aufspalten
with lines as (
    select json_array_elements(forbes2k_json::json) as company
    from forbes2k_json
),
-- Die Elemente der Zeilen in jeweils 12 Zeilen aufspalten, die Original-Zeilen nummerieren
entries as (
    select json_array_elements(company)::text as entry,
        row_number() over () as entrynr
    from lines
),
-- Die Felder nummerieren
fields as (
    select *,
        row_number() over (partition by entrynr) as fieldnr
    from entries
)
-- Mit 12 self joins die Tabellenstruktur aufbauen und die Felder konvertieren
select f1.entry::integer as rank,
    regexp_replace(f2.entry::text, '^"(.*)"$', '\1') as urlname,
    regexp_replace(f3.entry::text, '^"(.*)"$', '\1') as company,
    regexp_replace(f4.entry::text, '^"(.*)"$', '\1') as logoname,
    f5.entry::integer as sort,
    regexp_replace(regexp_replace(f6.entry::text, ',', ''), '^"(.*)"$', '\1')::numeric(10,3) as sales,
    regexp_replace(regexp_replace(f7.entry::text, ',', ''), '^"(.*)"$', '\1')::numeric(10,3) as profits,
    regexp_replace(regexp_replace(f8.entry::text, ',', ''), '^"(.*)"$', '\1')::numeric(10,3) as assets,
    regexp_replace(regexp_replace(f9.entry::text, ',', ''), '^"(.*)"$', '\1')::numeric(10,3) as marketvalue,
    regexp_replace(f10.entry::text, '^"(.*)"$', '\1') as country,
    regexp_replace(f11.entry::text, '^"(.*)"$', '\1') as industry,
    regexp_replace(f12.entry::text, '^"(.*)"$', '\1') as us_state
from fields f1
inner join fields f2 on f2.entrynr = f1.entrynr and f2.fieldnr = 2
inner join fields f3 on f3.entrynr = f1.entrynr and f3.fieldnr = 3
inner join fields f4 on f4.entrynr = f1.entrynr and f4.fieldnr = 4
inner join fields f5 on f5.entrynr = f1.entrynr and f5.fieldnr = 5
inner join fields f6 on f6.entrynr = f1.entrynr and f6.fieldnr = 6
inner join fields f7 on f7.entrynr = f1.entrynr and f7.fieldnr = 7
inner join fields f8 on f8.entrynr = f1.entrynr and f8.fieldnr = 8
inner join fields f9 on f9.entrynr = f1.entrynr and f9.fieldnr = 9
inner join fields f10 on f10.entrynr = f1.entrynr and f10.fieldnr = 10
inner join fields f11 on f11.entrynr = f1.entrynr and f11.fieldnr = 11
inner join fields f12 on f12.entrynr = f1.entrynr and f12.fieldnr = 12
where f1.fieldnr = 1
order by rank, sort

Kompliziert ist es nicht, nur viel zu tippen (und copy/paste-en). Da die Daten selbst keine Feld-Metadaten wie Name und Typ enthalten, muß man sie selbst festlegen.

Processing a JSON array in PostgreSQL

I needed to get a JSON data structure from the web and put its contents into a database. These data were a bit special in the sense that the JSON only contained only a two dimensional array interpreted by the website, without any field names.

In R it was quite easy:

require(rjson)

# Load JSON array and convert to a list
global2k_lst <- fromJSON(file="http://www.forbes.com/ajax/load_list/?type=organization&uri=global2000&year=2014");
# Convert to a one-dimensional vector
global2k <- unlist(global2k_lst)
# Change to a matrix by specifying the dimensions
dim(global2k) <- c(12,2000)
# Convert the matrix to a data frame and specify the field names
global2k <- as.data.frame(t(global2k))
names(global2k) <- c("rank", "urlname", "name", "logoname", "sort",
                     "sales", "profits", "assets", "marketvalue",
                     "country", "industry", "us_state")

write.csv2(global2k, "/tmp/forbes2000.csv", row.names=FALSE)

On the other hand, PostgreSQL has lots of JSON functions since release 9.3. So how to do it directly in the database?

The first step is reading the entire JSON string into a table in a field called „forbes2k_json“. (PostgreSQL can easily store 244 kBytes of data in a single field.) A not too complex query converts the array contents into a normal table:

-- JSON array into 2000 lines
with lines as (
    select json_array_elements(forbes2k_json::json) as company
    from forbes2k_json
),
-- Existing lines converted into 12 lines each, with an additional row number for 
-- the original lines
entries as (
    select json_array_elements(company)::text as entry,
        row_number() over () as entrynr
    from lines
),
-- Row numbers of the entry lines
fields as (
    select *,
        row_number() over (partition by entrynr) as fieldnr
    from entries
)
-- 12 self joins for building the table structure; convert field types
select f1.entry::integer as rank,
    regexp_replace(f2.entry::text, '^"(.*)"$', '\1') as urlname,
    regexp_replace(f3.entry::text, '^"(.*)"$', '\1') as company,
    regexp_replace(f4.entry::text, '^"(.*)"$', '\1') as logoname,
    f5.entry::integer as sort,
    regexp_replace(regexp_replace(f6.entry::text, ',', ''), '^"(.*)"$', '\1')::numeric(10,3) as sales,
    regexp_replace(regexp_replace(f7.entry::text, ',', ''), '^"(.*)"$', '\1')::numeric(10,3) as profits,
    regexp_replace(regexp_replace(f8.entry::text, ',', ''), '^"(.*)"$', '\1')::numeric(10,3) as assets,
    regexp_replace(regexp_replace(f9.entry::text, ',', ''), '^"(.*)"$', '\1')::numeric(10,3) as marketvalue,
    regexp_replace(f10.entry::text, '^"(.*)"$', '\1') as country,
    regexp_replace(f11.entry::text, '^"(.*)"$', '\1') as industry,
    regexp_replace(f12.entry::text, '^"(.*)"$', '\1') as us_state
from fields f1
inner join fields f2 on f2.entrynr = f1.entrynr and f2.fieldnr = 2
inner join fields f3 on f3.entrynr = f1.entrynr and f3.fieldnr = 3
inner join fields f4 on f4.entrynr = f1.entrynr and f4.fieldnr = 4
inner join fields f5 on f5.entrynr = f1.entrynr and f5.fieldnr = 5
inner join fields f6 on f6.entrynr = f1.entrynr and f6.fieldnr = 6
inner join fields f7 on f7.entrynr = f1.entrynr and f7.fieldnr = 7
inner join fields f8 on f8.entrynr = f1.entrynr and f8.fieldnr = 8
inner join fields f9 on f9.entrynr = f1.entrynr and f9.fieldnr = 9
inner join fields f10 on f10.entrynr = f1.entrynr and f10.fieldnr = 10
inner join fields f11 on f11.entrynr = f1.entrynr and f11.fieldnr = 11
inner join fields f12 on f12.entrynr = f1.entrynr and f12.fieldnr = 12
where f1.fieldnr = 1
order by rank, sort